Getting started

3 steps to integrate GiftTagg to Shopify, 'Debut' theme, onto the cart page
Visit our demo store to play around with the end result

Step 1. Add our widget to a page on your website >

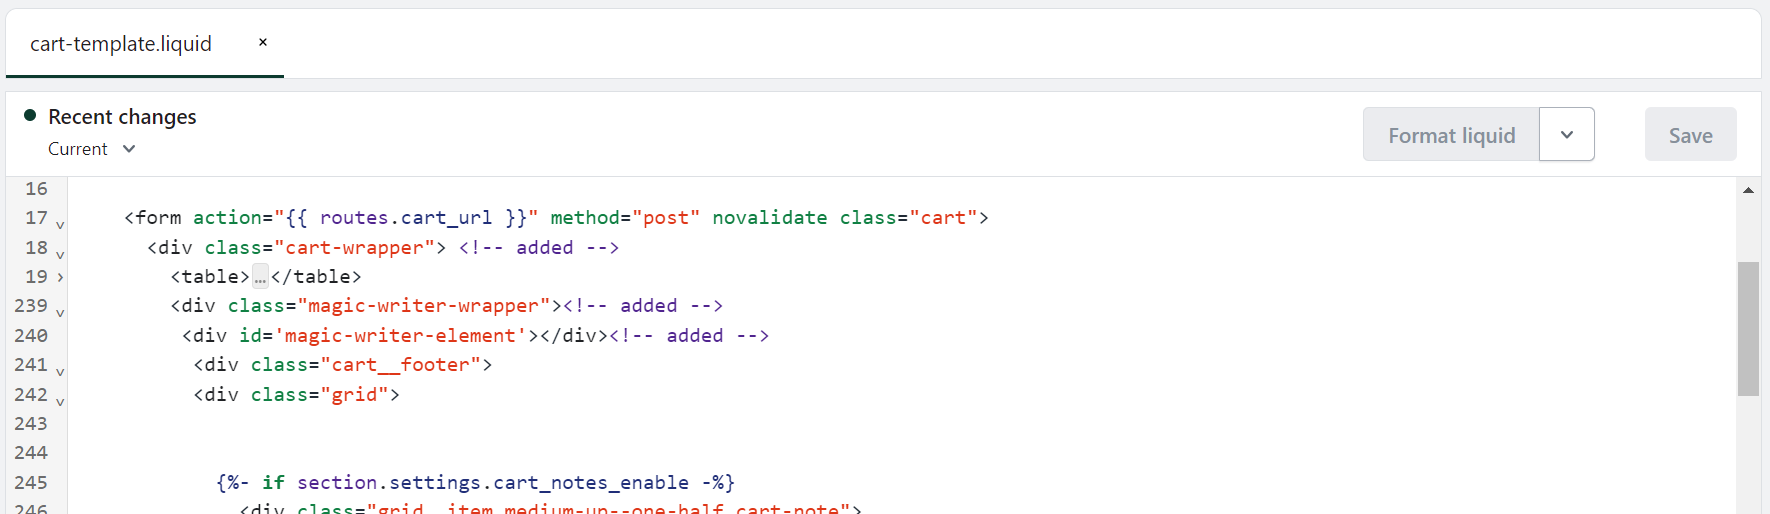
Add the div code wherever you want our GiftTagg Personalisation Widget to appear.

We recommend on the cart page, i.e. in > Sections > cart-template.liquid

We usually add the widget right of the Cart table (which shows items added to cart)

Step 1.1. 'Ctrl + f' to open search bar and search for <table>
In a new line above <table> add:


Step 1.2. 'Ctrl + f' to search for </table>

In a new Below </table> add:

div class="magic-writer-wrapper"
div id='magic-writer-element'

Step 1.3. 'Ctrl + f' to search for </form>

Above </form> add:

textarea name="note" id="CartNote" style="display:none;">{{ cart.note }}

Screenshot of integrated code:

Step 2. Position widget via css >

Go to Assets > theme.css

Scroll to bottom of theme.css and add:


.cart-wrapper {
     display: flex;
      gap: 50px;
   }

  .cart-wrapper table {
    height: fit-content;
  }


  @media only screen and (max-width: 750px) {
  .cart-wrapper {
    flex-direction: column;
    } 
  }

   .magic-writer-wrapper {
     display: flex;
       gap: 30px;
     flex-direction: column;
     justify-content: center;
     align-items: flex-end;
   }

@media only screen and (max-width: 750px) {
  .magic-writer-wrapper {
    align-items: center;
    } 
  }

Screenshot of integrated code:

Step 3. Add the widget script >

Go to Layout > theme.liquid


'Ctrl + f' to search for </head>
In a new line above </head> add the script below:

script id='gifttaggScript' src="https://s3.eu-west-1.amazonaws.com/widget-prod.gifttagg.com/bundle.js" defer
 script type="text/javascript"
    /**
    * Gifttagg v3
    */
    const handleGenerateGiftnote = function (gifttagg,  magicWriter) {   
      var message = ""
        if(gifttagg !== undefined && magicWriter === undefined){
          message = gifttagg.firstName + ' ' + gifttagg.lastName + ' has sent you a very special video / voice message. To play, visit play.gifttagg.com & enter message code: ' + gifttagg.code
        } else if(gifttagg === undefined && magicWriter !== undefined){
           message = magicWriter.message
        } else if (gifttagg !== undefined && magicWriter !== undefined) {
           message = magicWriter.message + '\n\n' + gifttagg.firstName + ' ' + gifttagg.lastName + ' has sent you a very special video / voice message. To play, visit play.gifttagg.com & enter message code: ' + gifttagg.code
        }

      updateCartItems(message)

      return message
      }

    const config = {
      widget: {
        containerId: 'magic-writer-element',
        giftNoteId: 'CartNote',
        generateGiftnote: handleGenerateGiftnote
      },
      magicWriter: {
        giftNoteMaxChars: 400,
        magicWriterMaxChars: 300,
        maxGenerations: 10,
        homePage: {
          disabled: false,
          includeGiftNoteInWidget: true,
          generateButtonVisible: true,
          dividerVisible: true,
          gifttaggVisible: true,
        },
        formPage: {
          titleVisible: true,
          disableToField: false,
          disableFromField: false
        },
        theme: {
          accentColor: '#f4263e'
        },
        // overrides:{
        //   overrideWidth: '100%'
        // },
      },
      gifttagg: {
        functionality: {
          recordLaterEnabled: false
        },
        theme: {
          name: 'default'
        },
      }
    };

    
    var sdk;
    var gifttaggScript = document.getElementById('gifttaggScript');
    
    gifttaggScript.addEventListener('load', function() {
        sdk = gifttaggSDK.Build(config)
    });

    function openGiftTag() {
      sdk.gifttagg.open();
    }

    async function updateCartItems(giftMessage) {
      var cartContents = await fetch(window.Shopify.routes.root + 'cart.js')
      .then(response => response.json())
      .then(data => { return data });

      if (cartContents.items.length > 0) {
        var updateItems = [];
        cartContents.items.forEach(async (item, index) => {
          if (item.id != '42182325993645') { 
            await fetch(window.Shopify.routes.root + 'cart/change.js', {
              method: 'POST',
              headers: {
                'Content-Type': 'application/json'
              },
              body: JSON.stringify({'id': item.key, 'quantity': item.quantity, 'properties': {"Message": giftMessage} })
            })
            .then(response => response.json())
            .then(data => { return data });
          }
        });
      }
    }
   /script
   

Screenshot of integrated code:

Step 4. Customise the widget >

In the script added to Layout > theme.liquid you can select different functionality & branding.

OPTIONAL

Step 4.1. Toggle Magic Writer AI to show = generateButtonVisible: true,

(To hide, change true to' false')

Step 4.2. Toggle Video/Voice Messages to show = gifttaggVisible: true,

(To hide, change true to' false')

Step 4.3. Toggle dividing line between Magic Writer + Video section to show = dividerVisible: true

(To hide, change true to' false')


generateButtonVisible: true,
dividerVisible: true,
gifttaggVisible: true,

Screenshot of integrated code:

Optional. Step 5. Customise Magic Writer >

Admins can set the following

  • Number of free message generations
  • Maximum characters for the gift note
  • Maximum characters to send to Magic Writer
  • Properties for the home page  
  • Properties for the form page
  • Accent color used throughout the widget
  • Override the default width of the widget, i.e. display as full page width or default size etc
  • Handler for saving the message


{
  maxGenerations: number, // Number of free message generations
  giftNoteMaxChars: number, // Maximum characters for the gift note
  magicWriterMaxChars: number, // Maximum characters to send to Magic Writer
  homePage?: HomePageProps, // Properties for the home page
  formPage?: FormPageProps, // Properties for the form page
  theme?: {
    accentColor?: string // Accent color used throughout the widget
  },
  overrides?: {
    overrideWidth?: string // Override the default width
  },
  handlers?: {
    save?: (message?: string) => void // Handler for saving the message
  }
}

Properties for the home page:

{
  disabled?: boolean, // Don't show the first page
  includeGiftNoteInWidget?: boolean, // Embed a text area into the widget
  placeHolderForEmbedGiftNote?: string, // Placeholder text in the embed text area
  generateButtonVisible?: boolean, // Generate message button visibility
  dividerVisible?: boolean, // Divider visibility
  gifttaggVisible?: boolean // Add Gifttagg video section visibility
}

Properties for the form page:

{
  titleVisible?: boolean, // Title visibility
  disableToField?: boolean, // Disable "To" field
  disableFromField?: boolean, // Disable "From" field
  options?: OptionsProps // Options for tones, character styles, and writing styles
}

Properties for Options of Tone, Character/Writing Styles:

An optional array of Option objects representing the tone, character and writing styles.

These character styles will appear first in the list, followed by the writing styles.

When the user clicks "Surprise Me," the SDK will select one random character style and one random writing style.

Each Option object has the following properties:

  • value (string): The value of the option that will be sent to the backend api for message generation.
  • label (string): The label to be displayed for the option in the dropdown menu.

In the below example of how to define the OptionsProps, the options object defines three tones, three character styles, and three writing styles.

You can customize the values and labels based on your requirements.

const options: OptionsProps = {
  tones: [
    { value: "tone1", label: "Tone 1" },
    { value: "tone2", label: "Tone 2" },
    { value: "tone3", label: "Tone 3" }
  ],
  characterStyles: [
    { value: "style1", label: "Style 1" },
    { value: "style2", label: "Style 2" },
    { value: "style3", label: "Style 3" }
  ],
  writingStyles: [
    { value: "writing1", label: "Writing 1" },
    { value: "writing2", label: "Writing 2" },
    { value: "writing3", label: "Writing 3" }
  ]
};

Optional. Step 6. Customise Video/Voice Message Functionality >


{
  embedded?: {
    embeddedContainerId: string // ID of the embedded container
  },
  functionality?: {
    recordLaterVideoCode?: string, // Video code for recording later
    recordLaterEnabled?: boolean // Enable recording later functionality
  },
  theme?: {
    name: string // Theme name
  },
  autoSubmitData?: {
    firstName: string,
    lastName: string,
    email: string
  },
  handlers?: {
    callback?: (code: string, firstName: string, lastName: string, email: string) => void, // Callback handler
    onClose?: () => void, // Handler for modal close
    onLoad?: () => void // Handler for modal load
  }
}